Framing Assistant
To open the framing assistant, make sure to have selected an FOV Profile and press Go & Solve.

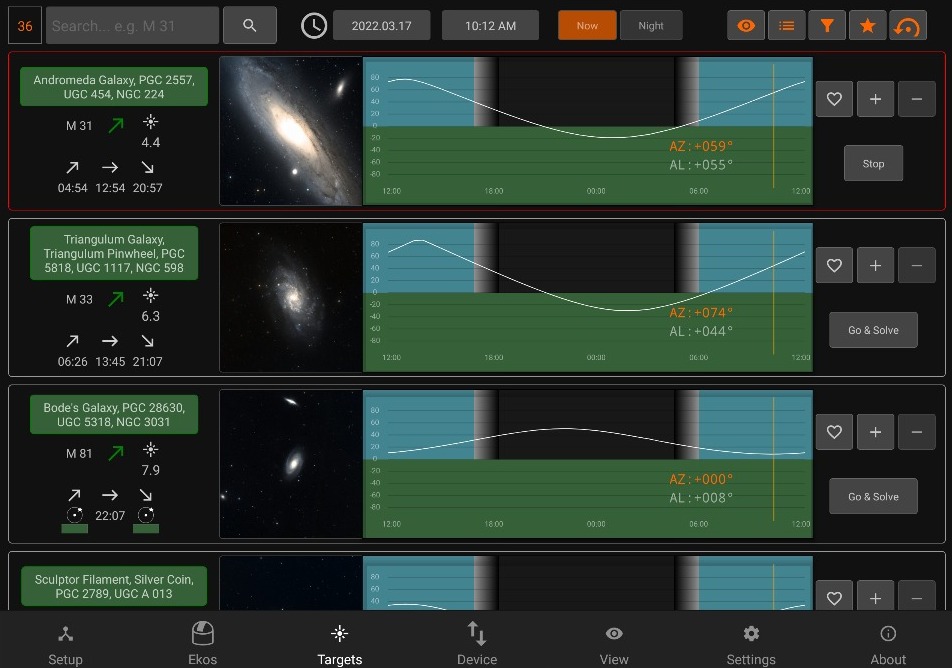
StellarMate will command the mount to slew to the target location. This is indicated by a magenta border around the target. Once Slew is complete, the alignment process begins which is indicated by a yellow border. A red border indicated alignment error or alignment is not within threshold. Please wait until the solver iterates to center the target exactly in the center of the sensor. Once this is done, the border turns to Green. Now that the plate solving is complete, you may proceed to use the Framing Assistant tool that helps you in adjustment the orientation of the camera to match your desired orientation either manually or automatically if a rotator device is detected.
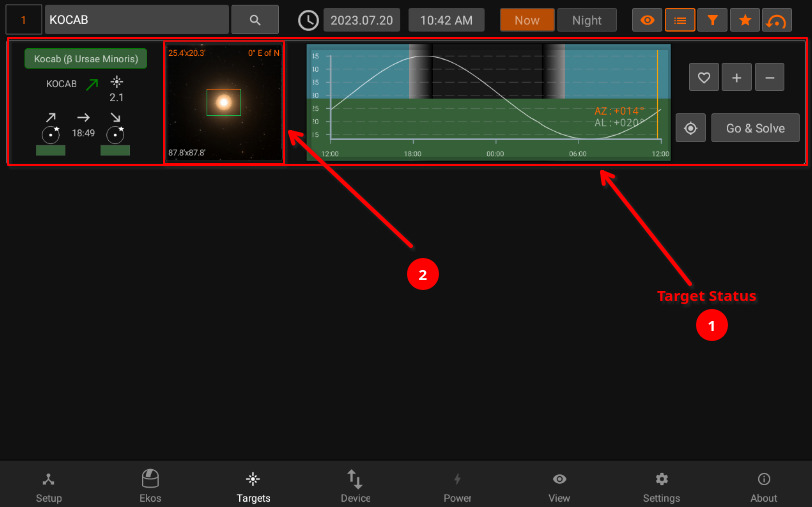
Once the status turns to green (1), press the image (2) to open the Framing Assistant
- Framing Assistant
The framing assistant tool puts precise framing control at your fingertips.
- Intuitive Interface: Easily adjust your target's position and orientation within the frame using straightforward controls.
- Clear Visual Feedback: See the exact area that will be captured with the field-of-view indicator, ensuring perfect framing every time.
- Simple Adjustments: Make quick and precise adjustments to frame your subject exactly as you envision.
To access the framing assistant, simply tap the target image. If the field-of-view (FOV) indicator isn't visible, choose the desired FOV from the dropdown menu. For a more automated approach, tap Go & Solve to initiate a sequence of actions: the mount will slew to the target (marked by a magenta border), followed by plate solving to align the image (indicated by a yellow border).
Pay attention to border colors during alignment: red signals an error or misalignment, requiring patience as the solver works to center the target. Once successful, a green border confirms perfect alignment, readying you for a perfectly framed capture.
Once the status turns to green (1), press the image (2) to open the Framing Assistant.
Adjust the rotation and/or position of the desired frame by using hand gestures to pan and rotate. Zoom in or out using the designated buttons to increase or decrease the field of view.
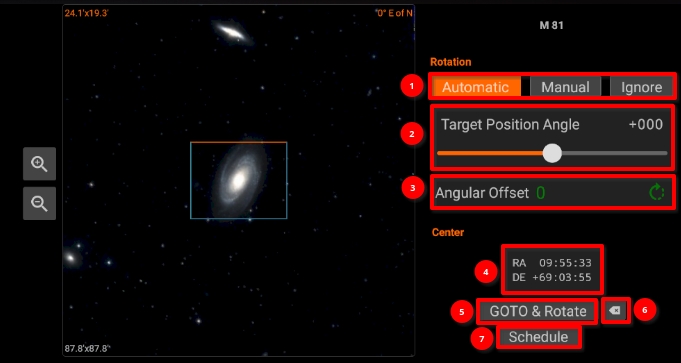
- The Framing Assistant provides three modes to deal with rotation:
- Automatic: This mode is available if a rotator device (e.g. Nightcrawler) is coupled with your imaging camera and can rotate it on its axis. With a rotator, no manual intervention is necessary as StellarMate calculates the exact offset required to arrive at the target position angle.
- Manual: Set the desired target rotation first, then check the required Angular Offset value. Go to your camera and rotate it manually by hand using your best judgment. Tap GOTO & Rotate to measure the new orientation of the camera. Once plate solving is complete, the new camera orientation and angular offset are updated. Repeat this process as many times as necessary until you are satisfied with the result. Your goal is to bring the Angular Offset down to zero.
- Ignore: Completely ignore rotation.
- Adjust the rotation of the desired FOV orientation with either the slider or hand gestures. The target FOV rectangle color is blue with orange designating the top. The green rectangle with orange on top is your camera's current FOV & orientation in the sky.
- Rotation offset in degrees between the current (Green) FOV and the target (Blue) FOV. When manually adjusting the camera, rotate it clockwise or counterclockwise as per the indicated icon.
- J2000 Center Right Ascension & Declication coordinates.
- Once all the necessary adjustments are made, tap GOTO & Rotate to start the framing process. If a rotation offset is required and the rotation mode is either automatic or manual, Ekos will issue a GOTO command followed by a rotation command if applicable.
- Reset all adjustments made to the FOV.
- Add the target to the Scheduler module. If the rotation mode is either Automatic or Manual, then the target Position Angle is also set in the scheduler. This commands Ekos to plate solve and adjust the captured image frame to match the desired position angle either automatically (if a rotator device is connected) or manually.
If Ekos is offline, you can Schedule your target coordinates by using framing assistant in Scheduler module.
