


{extra_toc}
Introduction

Ekos Alignment Module enables highly accurate GOTOs to within sub-arcseconds accuracy and can measure and correct polar alignment errors. This is possible thanks to the StellarSolver library. Ekos begins by capturing an image of a starfield, feeding that image to the solver, and getting the central coordinates (RA, DEC) of the image. The solver essentially performs a pattern recognition against a catalog of millions of stars. Once the coordinates are determined, the true pointing of the telescope is known.
Often, there is a discrepancy between where the telescope thinks it is looking at and where it is truly pointing. The magnitude of this discrepancy can range from a few arcminutes to a couple of degrees. Ekos can then correct the discrepancy by either syncing to the new coordinates, or by slewing the mount to the desired target originally requested.
Furthermore, Ekos provides the Polar Alignment Assitant Tool: An easy to use tool for measuring and correcting polar errors. It takes three images any where in the sky (prefreably close to the celestial poles but not required) and then calculates the offset between the mount axis and polar axis.
At a minimum, you need a camera and a mount that supports Slew & Sync commands. Most popular commercial mounts nowadays support such commands.
For the Ekos Alignment Module to work, you have an option of either utilizing the built-in StellarSolver, or remote solver
- StellarSolver: The default solver in Ekos. StellarSolver supports native plate-solving based on astrometry.net. Furthermore, it supports online (internet-based) astrometry.net solving, ASTAP, and local offline astrometry.net solver (Available for macOS & Linux). The built-in solver is fast and supported across all platforms.
- Remote Solver: The remote solver is an offline solver the resides on a different machine (for example, you can use Astrometry solver on StellarMate). Captured images are solved on the remote machine.
Alignment vs Polar Alignment
It is important to understand the differences between Alignment (or more accurately GOTO Alignment) and Polar Alignment. They are two very different procedures that are designed for different purposes. The following is a summary on what each method is used for.
Goto Alignment |
Polar Alignment |
|
|
StellarSolver Integration
StellarSolver is an astrometric plate-solving library that has been integrated into Ekos in order to provide accurate and efficient offline plate solving.
For plate-solving there are several parts in StellarSolver that are important:
Source Extraction
To find the stars in your image in order to solve. In StellarSolver, there are options for 3 different methods:
- Internal SEP: this requires no external programs, it is the same SEP star extraction algorithm that has existed in KStars for Focus and Guiding for awhile now. It is essentially a library version of the method below (though there are some differences which is why they give slightly different results). It is entirely internal to the program, so there are no files saved to disk for the extraction which is great for Raspberry Pis etc.
- External Sextractor: this does require an external program, SExtractor, or the Source Extractor. This is their official standalone program. The drawback is you would need to have sextractor installed and it does save a bunch of files to disk in order to do its operations.
- BuiltIn Sextractor: This uses whatever method of source extraction the solver uses by default. StellarSolver uses SEP, just like the Internal SEP setting. Local astrometry.net uses its own source extraction method which uses a bunch of external resources including python, netpbm and other packages. And finally, ASTAP has its own internal source extractor which is pretty good.
Note: Either Internal SEP or External Sextractor should be superior to the built-in version of the programs. SExtractor is very good at extracting stars, and that greatly speeds up solving, but it requires tuning up the options to perfect it for your optical train.
The Solver
The program that will be used to do the solving of the sources that were found. In StellarSolver, there are 4 options for that
- StellarSolver: This option uses an internal library build of astrometry.net. It uses no external files like configuration files etc, and saves no files to disk (except 0KB solved and cancel files) which is great for
 Raspberry Pis. Since this library is entirely internal, no programs have to be installed beyond KStars itself, so if you are going to use this option, you don't need the astrometry.net package at all. This is going to make a world of difference for Windows users who cannot install astrometry.net unless they do it in a compatibility layer.
 - Local Astrometry.net: This option uses the good old fashioned local astrometry.net installation many users have used with KStars for years. The only differences in Stellarsolver are that we no longer need the configuration files, we can do parallelization to make it MUCH faster, and we can use Internal SEP or External Sextractor to give it the sources to solve.
- Local ASTAP: ASTAP was available in KStars previously, but more options have been implemented for using it in StellarSolver as well as giving you the option to use Internal SEP or SExtractor with it. The options for ASTAP are now shared with astrometry so you can just set your options in the profile and it will work fine. ASTAP does NOT support parallelization.
- Online Astrometry.net: This option was previously available in KStars as well, but a bunch of work has been done on it to make it work better, to use Internal SEP or Sextractor if you like, to use the options in the profiles, and to provide clearer feedback to the user about what is going on. Technically, online Astrometry.net is already using parallelization on their server, so there was no need to implement parallelization for it.
The Options Profiles
Here are the profiles that have been developed:
Profiles mainly for Solving:
1-FastSolving: solve images fast, but it does not do parallel solves.
2-ParallelSolving: It can be faster than FastSolving, but does not work nearly as well as the next 2.
3-ParalleLargeScale: This profile is meant to solve DSLR scale images very fast. It assumes larger image scales to solve faster than the above.
4-ParallelSmallScale: The DEFAULT for solving. This profile is meant to solve telescopic images quickly. Most users should probably use this one.
Profiles mainly for Source Extraction in Focus and Guide
5-AllStars: This profile is meant to detect all the stars in an image.
6-SmallSizedStars: detects smaller stars and ignores bigger stars
7-MidSizedStars: detects medium-sized stars
8-BigSizedStars: detects bigger stars and ignores smaller stars
ANSVR Solver
Users on Windows OS can install ANSVR Local Astrometry.net solver and use it as a pseudo online solver that happens to be running a server on their machine. It is not recommended given that StellarSolver is built-in and faster. It is left in the documentation for users who want to try it out.
![]()
ANSVR mimics the astrometry.net online server services on your local computer; thus the internet not required for any astrometry queries. From the point of view of Ekos, it is still communicating with an online astrometry.net server.
After installing the ANSVR server and downloading the appropriate index files for your setup, make sure ANSVR server is up and running and then go to Ekos Alignment options where you can simply change the API URL to use the ANSVR server as illustrated below:

Do not forget to include the full URL including the HTTP part. In Ekos Align module, you must set the solver type to Online so that it uses the local ANSVR server for all astrometry queries. Then you can use the align module as you would normally do.
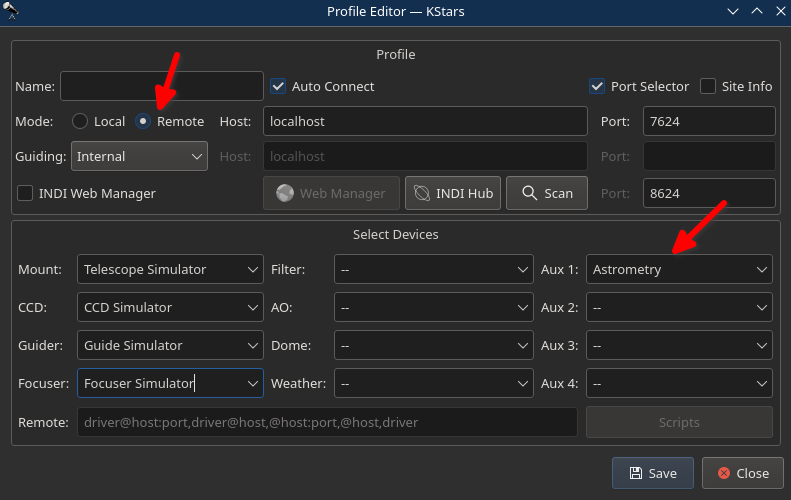
Remember as indicated above that StellarMate already includes astrometry.net. Therefore, if you would like to use StellarMate remotely to solve your images, simply change the solver type to Remote and ensure that your equipment profile includes Astrometry driver which can be selected under the Auxiliary dropdown. This is applicable to all operating systems and not just Windows.
StellarSolver vs. Remote
Remove Solver can be used if you are running Ekos on a PC/macOS and you would like to execute the plate-solving on StellarMate. In order for Remote solver to be available in Ekos, you must select the Astometry driver in your equipment profile. In the Profile Editor, select Astrometry driver in the AUX drivers list. Once the remote solver is detected, you can switch Ekos to utilize it in the Align module.
Download Index Files
For offline (and remote) solvers, index files are necessary for the solver to work. The complete collection of index files is huge (over 30 GB), but you only need to download what is necessary for your equipment setup. Index files are sorted by the Field-Of-View (FOV) range they cover. There are two methods to fetch the necessary index files: The new download support in Align module, and the old manual way.
Automatic Download
Automatic download is only available for Ekos users on Linux & macOS. For Windows users, please download ANSVR solver.
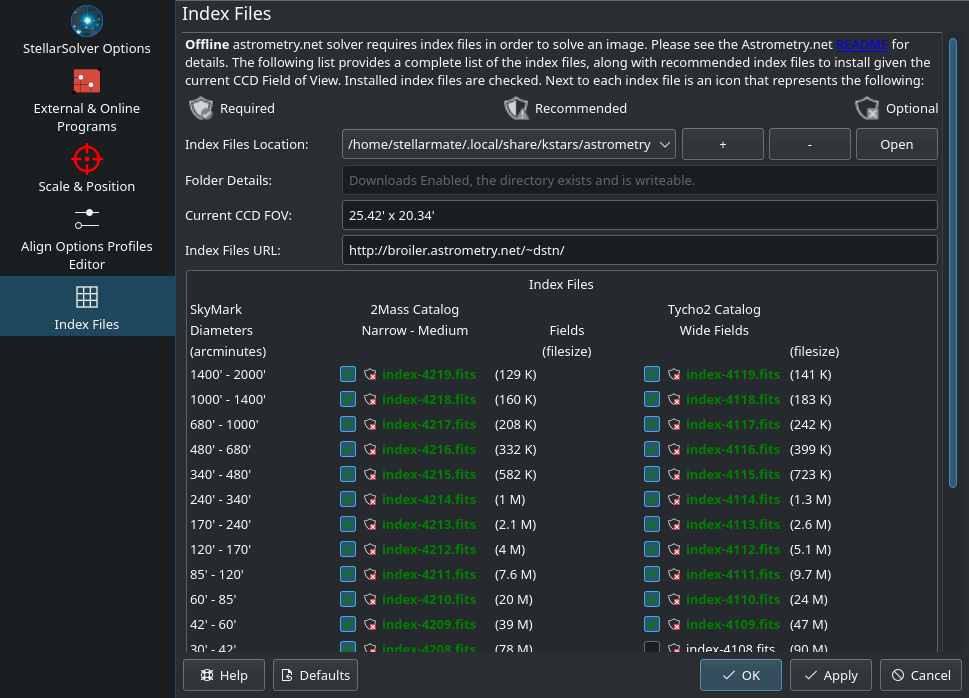
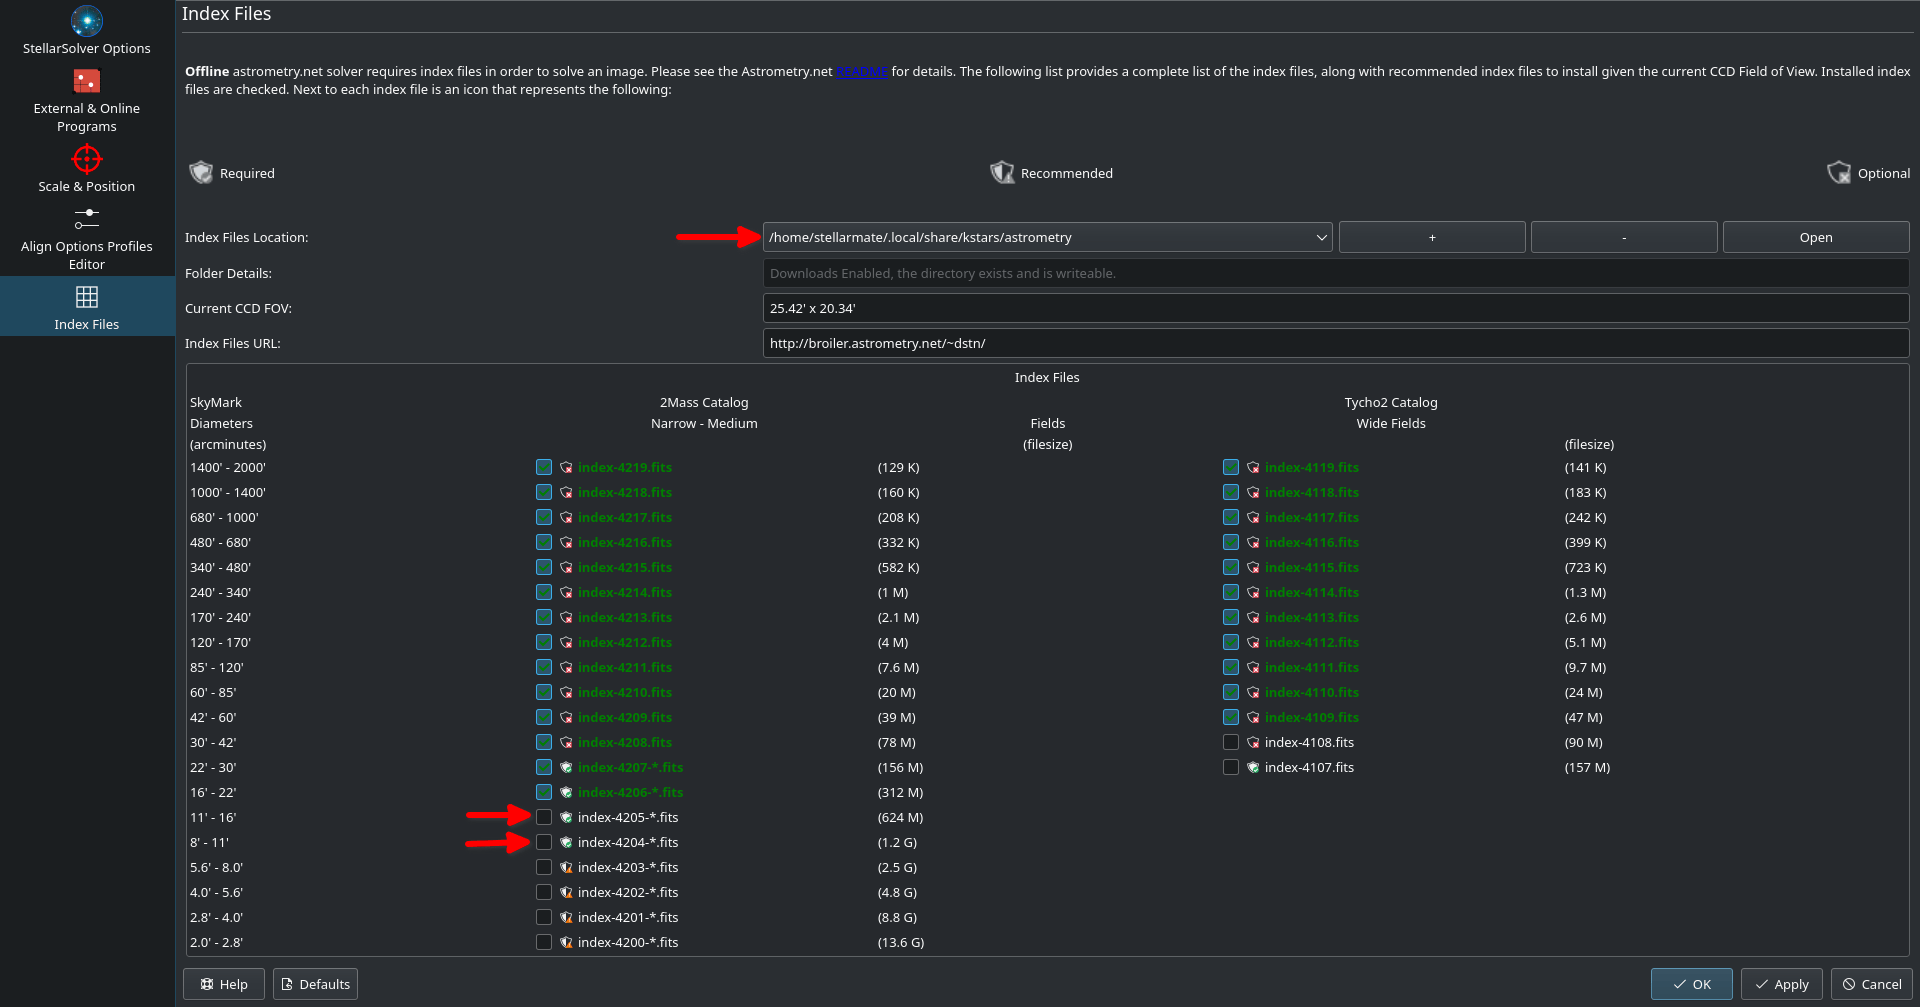
To access the download page, click the Options button in the Align module and then select Astrometry Index Files tab. The page displays the current FOV of your current setup and below it a list of available and installed index files. Three icons are used to designate the importance of index files given your current setup as following:
 Required
 Recommended
 Optional
You must download all the required files, and if you have plenty of hard drive space left, you can also download the recommended indexes. If an index file is installed, the checkmark shall be checked, otherwise check it to download the relevant index file. By default, StellarMate comes pre-installed with index files 4206 to 4219. Due to size restrictions, indexes 4204 and 4205 are not included in the official StellarMate OS image. It is recommended to download them. From Astrometry Index Files tab, click on Index File Location combo and select the first entry below All Sources. Once selected, you should be able to download the necessary index files as illustrated below.
Please only download one file at a time, especially for larger files. Once you installed all the required files, you can begin using the offline astrometry.net solver immediately.
Manual Download
You need to download and install the necessary index files suitable for your telescope+CCD field of view (FOV). You need to install index files covering 100% to 10% of your FOV. For example, if your FOV is 60 arcminutes, you need to install index files covering skymarks from 6 arcminutes (10%) to 60 arcminutes (100%). There are many online tools to calculate FOVs, such as the Astronomy tool.
| Index Filename | FOV (arcminutes) | Debian Package |
|---|---|---|
| index-4219.fits | 1400 - 2000 | astrometry-data-4208-4219 |
| index-4218.fits | 1000 - 1400 | |
| index-4217.fits | 680 - 1000 | |
| index-4216.fits | 480 - 680 | |
| index-4215.fits | 340 - 480 | |
| index-4214.fits | 240 - 340 | |
| index-4213.fits | 170 - 240 | |
| index-4212.fits | 120 - 170 | |
| index-4211.fits | 85 - 120 | |
| index-4210.fits | 60 - 85 | |
| index-4209.fits | 42 - 60 | |
| index-4208.fits | 30 - 42 | |
| index-4207-*.fits | 22 - 30 | astrometry-data-4207 |
| index-4206-*.fits | 16 - 22 | astrometry-data-4206 |
| index-4205-*.fits | 11 - 16 | astrometry-data-4205 |
| index-4204-*.fits | 8 - 11 | astrometry-data-4204 |
| index-4203-*.fits | 5.6 - 8.0 | astrometry-data-4203 |
| index-4202-*.fits | 4.0 - 5.6 | astrometry-data-4202 |
| index-4201-*.fits | 2.8 - 4.0 | astrometry-data-4201-1 astrometry-data-4201-2 astrometry-data-4201-3 astrometry-data-4201-4 |
| index-4200-*.fits | 2.0 - 2.8 | astrometry-data-4200-1 astrometry-data-4200-2 astrometry-data-4200-3 astrometry-data-4200-4 |
The Debian packages are suitable for any Debian-based distribution (Ubuntu, Mint...etc). If you downloaded the Debian Packages above for your FOV range, you can install them from your favorite package manager, or via the following command:
sudo dpkg -i astrometry-data-*.deb
On the other hand, if you downloaded the FITS index files directly, copy them to /usr/share/astrometry directory.
It is recommended to use a download manager as such DownThemAll! for Firefox to download the Debian packages as browsers' built-in download manager may have problems with download large packages.
How to Use?
Ekos Align Module offers multiple functions to aid you in achieving accurate GOTOs. Start with your mount in home position with the telescope tube looking directly at the celestial pole. For users in Northern Hemisphere, point the telescope as close as possible to Polaris. Initial 2-3 star alignment might be required depending on your mount make:
- EQMod, Celestron Aux (e.g. Evolution), AstroTrac: No need to perform initial alignment, Ekos alignment module can work with the mount right away after power up given the mount is in its home position.
- All other Mount drivers: Must intially perform 2-3 star alignment using the handset before you can use the Ekos alignment module.
Ekos Alignment module features the following functions:
- Optical Train: Select which optical train to use for alignment. Usally, it is the Primary optical train used in Camera module as well. Edit the optical train to ensure that the correct camera and telescope are selected. If using a focal reducer or balow, please specify it in the train configuration.
- Capture & Solve: Capture an image and determine what region in the sky the telescope is exactly looking at. The astrometry results include the equatorial coordinates (RA & DEC) of the center of the captured image in addition to pixel scale and field rotation. Depending on the Solver Action settings, the results can be used to Sync the mount or Sync and then Slew to the target location. For example, suppose you slewed the mount to Vega then used Capture & Solve. If the actual telescope location is different from Vega, it will be first synced to the solved coordinate and then Ekos shall command the mount to slew to Vega. After slew is complete, the Alignment module will repeat Capture & Solve process again until the error between reported and actual position falls below the accuracy thresholds (30 arcseconds by default).
- Load & Slew: Load a FITS or JPEG file, solve it, and then slew to it.
- Polar Alignment Assistant: A simple tool to aid in polar alignment of German Equatorial Mounts.
Warning! Never solve an image at or near the celestial pole (unless Ekos Polar Alignment Assistant Tool is used). Slew at least 20 degrees away from the celetial pole before solving the first image. Solving very close to the poles will make your mount pointing worse so avoid it.
Plate Solve Capture Settings
Configure plate solving capture settings:
- Exposure: Exposure duration in seconds
- Bining: Camera binning (2x2 is by default). Use 2x2 or 4x4 to speed up the process.
- Gain: For cameras supporting gain, set the desired gain.
- ISO: For cameras supporting ISO (e.g. DSLRs), set the desired ISO.
- Dark: Perform dark subtraction if a suitable dark frame is found in the Dark Library.
- Filter: If a filter wheel is used, then use this filter when capturing align images regardless of filter used in other modules.
- Solver Mode: Select solver mode (StellarSolver or Remote). Remote solver is only available when connecting to a remote device.
By default, the solver will search all over the sky to determine the coordinates of the captured image. This can take a lot of time; therefore, in order to speed up the solver, you can restrict it to only search within a specified area in the sky designated by the RA, DEC, and Radius options above.
Astrometry.net Settings
Options for offline and online solvers.
Most of the options are sufficient by default. If you have astrometry.net installed in a non-standard location, you can change the paths as necessary.
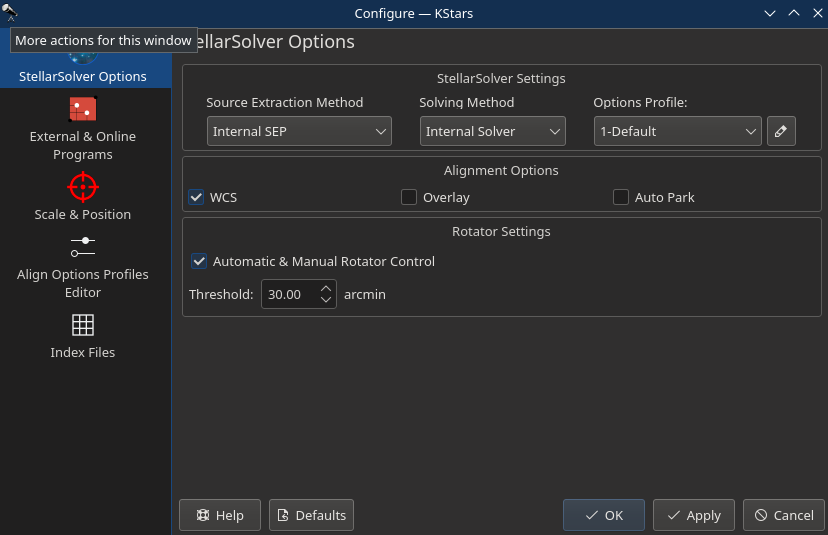
- Rotator: Rotator threshold in arc-minutes when using Load & Slew. If the difference between measured position angle and FITS position angle is below this value, the Load & Slew operation is considered successful.
- Time out: Timeout in seconds to wait for astrometry solver to complete.
- WCS: World-Coordinate-System is a system for embedding equatorial coordinate information within the image. Therefore, when you view the image, you can hover it and view the coordinate for each pixel. You can also click anywhere in the image and command to the telescope to slew there. It is highly recommeneded to keep this option on.
- Overlay: Overlay captured images unto the sky map of KStars.
- Upload JPG: When using online astrometry.net, upload all images are JPEGs to save bandwidth as FITS images can be large.
- Auto Park: Automatically park the mount after completing Polar Alignment Assistant Tools.
Warning: Turning Auto Park off might lead to inaccurate results.
Solver Options
Ekos selects and updates the optimal options by default to accelerate the performance of the solver. You may opt to change the options that are passed to the solver in case the default options are not sufficient.
Imaging Options
- Use Scale: Set image scale to speed up solver as it does not have to search index files of different image scales.
- Low: The lower end of the imager scale, calculated as a little smaller than the shorter dimension of the image.
- High: The high end of the imager scale, calculated as a little bigger than the longer dimension of the image.
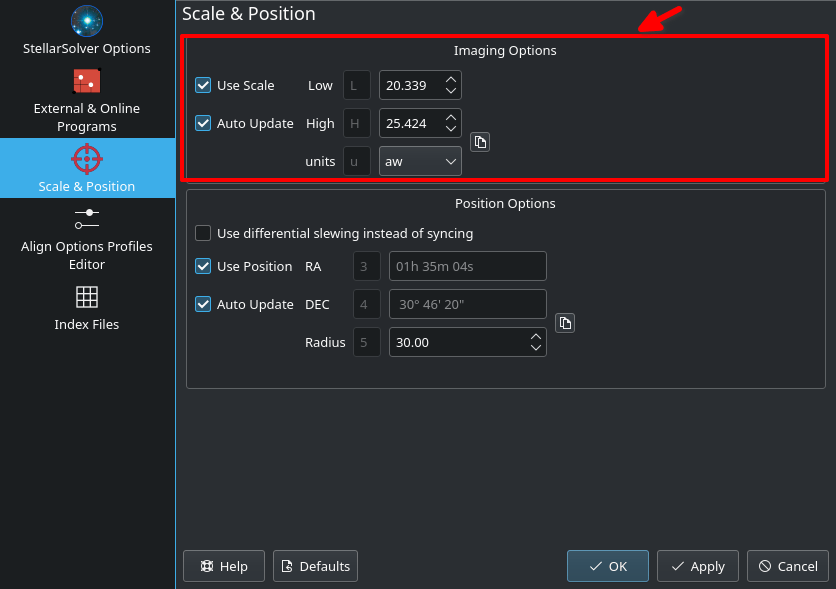
- Units: The units of the imager scale bounds above.
- dw: degree width
- aw: arcminute width
- app: arcsecs per pixel
 : Update Image Scale Bounds from the currently active camera and telescope combination.
- Auto Update: Automatically update image scale values when CCD and/or Mount parameters are updated.
- Down Sample: Downsample the image to shrink its size and speed up the solver.
- Auto: Automatically determine downsample value based on image size
Position Options
- Use differential slewing instead of syncing: Do not use Sync when Slew to Target is selected. Use differential slewing to correct for discrepancies. This is useful on some mounts (e.g. Paramount).
- Use position: Set estimated position to speed up astrometry solver as it does not have to search in other areas of the sky.
- RA: The RA of the Estimated Telescope/Image Field Position in hh:mm:ss notation
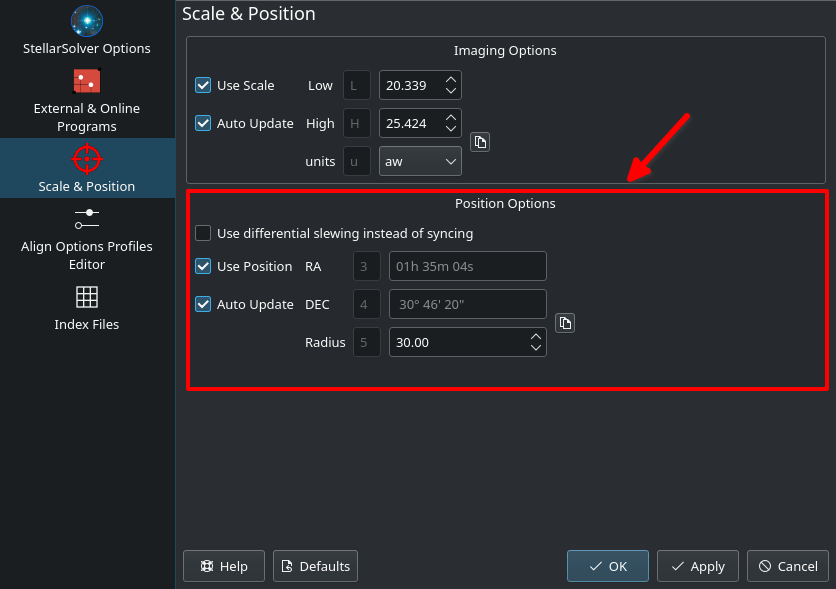
- DEC: The DEC of the Estimated Telescope/Image Field Position in dd:mm:ss notation
- Radius: The Search Radius for the Estimated Telescope/Image Field Position in degrees.
- : Update coordinates to the current telescope position.
- RA: The RA of the Estimated Telescope/Image Field Position in hh:mm:ss notation
- Auto Update: Automatically update position coordinates when mount completes slewing.
- Custom: Additional optional astrometry.net options.
If solving always fail even though the image contains lots of focused stars, then it is likely that either the frame field of view (FOV) and/or mount position is wrong. Turn off Use Scale or Use Position then try solving again. If the solving succeeds then that confirms that either the FOV scale or position are indeed incorrect.
Capture & Solve
Using Ekos Alignment Module, aligning your mount using the controller's 1, 2, or 3 star alignment is not strictly necessary, though for some mounts it is recommended to perform a rough 1 or 2 star alignment before using Ekos alignment module. If you are using EQMod, you can start using Ekos alignment module right away. A typical workflow for GOTO alignment involves the following steps:
- Set your mount to its home position (usually the NCP for equatorial mounts)
- Select Slew to Target in the Solver Action.
- Slew to a nearby bright star.
- After slew is complete, click Capture & Solve
If the solver is successful, Ekos will sync and then slew to the star. The results are displayed in the Solution Results tab along with a bullseye diagram that shows the offset the reported telescope coordinates (i.e. where the telescope thinks it is looking at) vs. its actual position in the sky as determined by the solver.
Each time the solver is executed and returns successful results, Ekos can run on the following actions:
- Sync: Syncs the telescope coordinates to the solution coordinates.
- Slew to Target: Syncs the telescope coordinates to the solution coordinates and then slew to the target.
- Nothing: Just solve the image and display the solution coordinates.
Troubleshooting
Sometimes, the solver would fail to solve an image for various reasons. Here are some tips to get you started in the right direction:
| Cause | Action | Ekos | App |
|---|---|---|---|
| Insufficient stars. Astrometry requires a few clearly visible and defined stars. |
|
Change Camera Settings in Ekos Alignment module. | Edit Align presets and change camera settings. |
| Unfocused image. Focused star field is necessary for astrometry to work. | Focus the camera until you get pin-point stars. | Focus camera automatically or manually via Focus module. | Focus camera automatically or manually via Focus module. |
| Wrong Field of View value. Ekos displays the FOV in arcminutes. |
|
||
| Wrong Mount position. Astrometry works when the mount is relatively close to the GOTO target. If it is too far away (more than a couple of degrees) then astrometry may fail. |
|
SM App syncs the device time and location from the phone/tablet GPS automatically upon connection. | |
| Missing astrometry index files | By default StellarMate come preinstalled with index files 4206 to 4219, but if your FOV is on the narrower scale, you might need to install more index files. | ||
| Automatic Downsampling |
|