


Demystifying the EKOS Automated Meridian Flip
Written by: John Evans
Introduction
Modern equatorial mounts are capable of automatically performing a Meridian Flip (MF). EKOS uses this capability and provides the workflow to coordinate the actions required, both within EKOS itself, and with the mount, to fully automate the MF process.
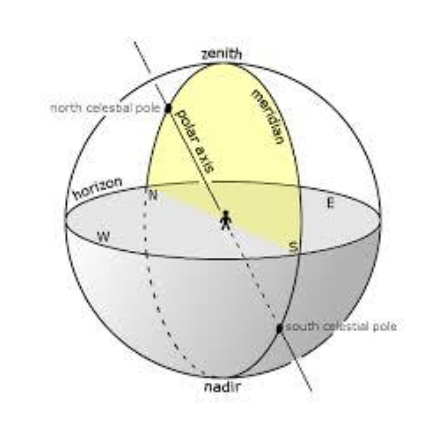
Typically, an equatorial mount in the Northern hemisphere, when polar aligned, will point to objects East of the polar axis by moving the telescope to the West side of the pier or tripod (counterweights down and to the East). As the object tracks through the night, the point comes where it reaches the Southern Meridian with the telescope now pointing south. The counterweight bar will now be horizontal.
Typically, the mount could continue to track as the object moves West by lowering the telescope and raising the counterweights. There will, however, come a point where the telescope or imaging equipment will collide with the tripod or pier. How far past the Meridian the scope could track before colliding will depend on the equipment being used. The way to avoid the collision is to flip the telescope from the West side of the pier over to the East side of the pier, i.e. to perform a MF. Now as the object is tracked further West, the scope will rise and the counterweights fall and there is no danger of the telescope or imaging train colliding with the tripod or pier.
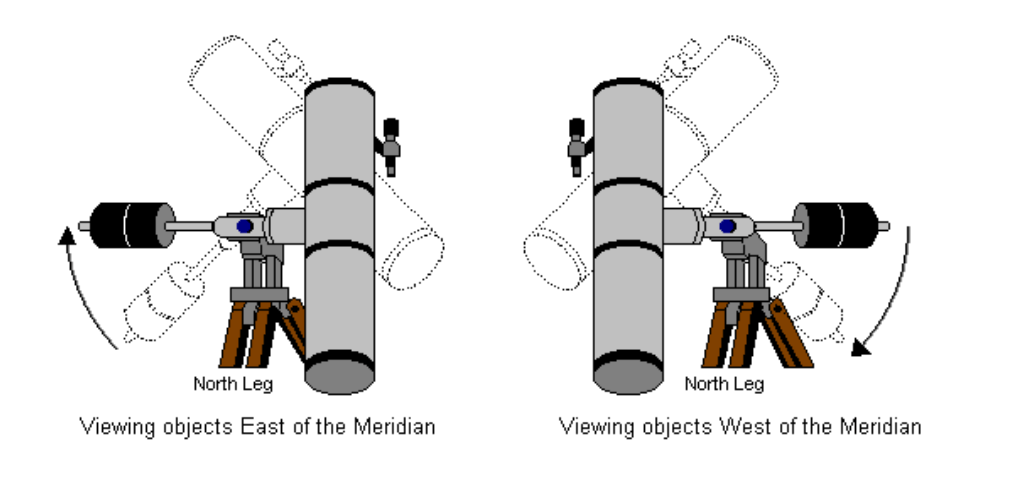
The mount’s movements are slightly different when tracking through the Northern Meridian; typically as the object approaches the Meridian from the west, the telescope will be on the western side of the Mount, and a MF will occur at the Meridian and flip the telescope to the eastern side.
Responsibility for Actions
The following is a list of actions that need to be done in order to perform an automated MF:
- Overall coordination of the MF process affecting multiple processes. Responsibility: EKOS
- Coordinate when the MF occurs. Responsibility: EKOS to coordinate
- Pause Capture Sequence prior to performing MF. Responsibility: EKOS Capture
- Pause Guiding. Responsibility: EKOS Guiding
- Stop Tracking. Responsibility: EKOS to coordinate with the Mount.
- When everything is ready for the MF, start the flip process. Responsibility: EKOS to initiate MF by instructing the mount.
- Check MF worked and deal with any issues. Responsibility: EKOS.
- Realign target. Responsibility: EKOS Align.
- Restart Tracking. Responsibility: EKOS to coordinate with the Mount.
- Restart guiding. Responsibility: EKOS Guiding.
- Refocus. Responsibility: EKOS Focus.
- Restart capture sequence. Responsibility: EKOS Capture
Preparing the Mount for a MF
It is recommended to understand how your mount performs a MF and understand the limitations it has, along with settings that may be required to be activated. Here are some things to consider:
- The mount may have an option to automatically perform a MF (e.g. when the mount reaches the Meridian). If so, this option should be deactivated. When the MF is initiated needs to be controlled by EKOS.
- The slew process in the Mount usually determines whether or not to perform a MF. The setup could be:
- The Mount may perform a MF if asked to slew to a location past the Meridian.
- There may be an Hour Angle (HA) (see The Hour Angle section for more details) range in which a MF can be performed. This may be configurable. If so, ensure you plan to initiate the MF from EKOS at a point consistent with the HA range that is set in the Mount. Also note that EKOS does not support MFs ahead of the Meridian.
- There may be HA limits that can be set to protect the telescope from colliding with the mount. Whilst it would normally make sense to set these, the values chosen need to be consistent with how EKOS is setup to perform the MF. So, for example, if an HA limit is reached before EKOS performs the MF, the mount may shutdown to protect itself.
Ensure cables, etc, are secure and will not snag during the MF. A good idea is to practice in daylight where snagging cables are more obvious. See the Testing in Daylight section.
How the Mount Performs a MF
Each mount is different so ensure you understand how your mount works, but the general process is:
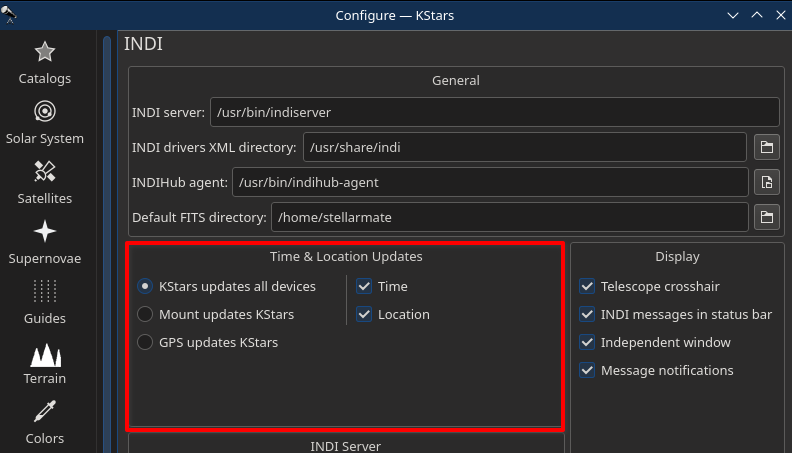
- The Mount needs to know where the Meridian is. In order to know this, it needs to know its location on the Earth and the datetime. There are several ways to keep EKOS and the Mount synchronised, and the INDI options tab allows several configurations (highlighted in red). It is important that the Mount and EKOS are both setup consistently otherwise problems are likely. A common problem is that EKOS initiates a MF but the Mount does not believe it has passed the Meridian, so does not flip.
- When the mount receives a “slew” command, it will drive the RA and Dec to the specified location. There are two possibilities:
- Telescope up and counterweights down.
- Telescope down and counterweights uP.
- The Mount will want to keep itself in position “a”. If the slew will take the Mount across the Meridian then it will need to perform a MF in order to keep consistent with “a”. So, the MF is just a part of the slewing process.
- When EKOS starts a MF, it issues a slew command to the Mount for the current target that is being tracked. The Mount notices, since it is past the Meridian, that it needs to perform a MF in order to keep the telescope up and counterweights down. So, the Mount flips.
The Hour Angle
EKOS uses the concept of Hour Angle (HA). HA is the angle between the Meridian and the Hour Circle. The Hour Circle is a circle through both celestial poles and the object in question. Since HA is an angle it can be measured in degrees. Another convention is to measure it in hours, minutes and seconds. Since a complete revolution (360° occurs in 24 sidereal hours) it is possible to use hours as a unit of measurement of the HA; 1 hour equals 15°.
The EKOS convention (in the Northern hemisphere):
- A negative HA means the object is East of the Meridian. Value range from -12 hours (North) to 0 (South).
- A positive HA means the object is West of the Meridian. Values range from 0 (South) to +12 hours (North).
So, when the Meridian is crossed:
- Southern crossing. The target crosses from East to West. HA values start negative (e.g. -5mins) increase to zero at the Meridian and turn positive (e.g. +5mins) as the target moves west.
- Northern crossing. The target crosses from West to East. HA values start positive (e.g. +11hours 55mins) increase to +12hours at the Meridian at which point the HA flips sign to -12hours and continues to increase (e.g. -11 hours 55mins) as the target moves East.
An advantage of using HA is that, defined in this way, the HA tells how long the object will take to get to the next Meridian. If an object has an HA of -1.5 hours, then in 1 hour 30mins it will reach the Southern Meridian. If an object has an HA of +10 hours 30mins then in 1 hour 30mins it will reach the Northern Meridian.
How EKOS Performs a MF
The initial setup for a MF is held on the Mount tab, in the Meridian Flip section.
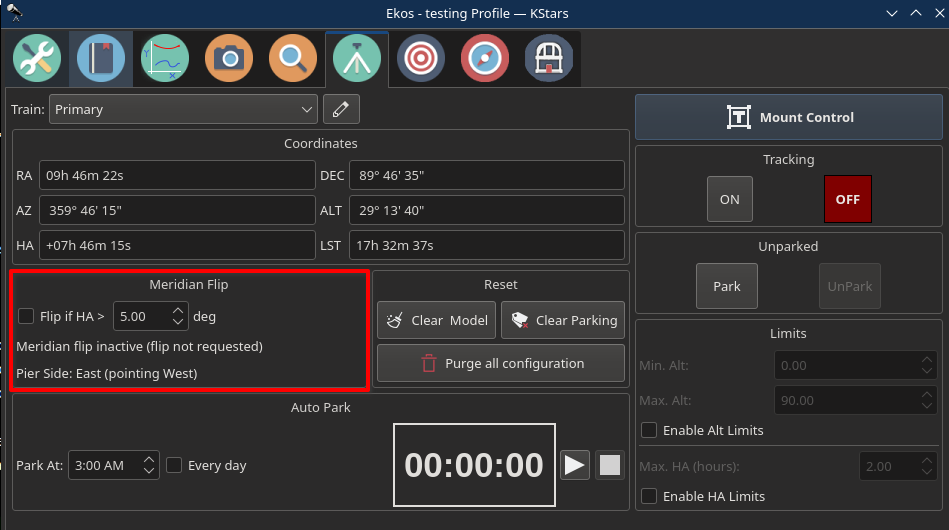
When Flip if HA > is checked then EKOS sets a timer for when to start the MF process based on the position of the current target and setting of the HA. It also displays the current Pier Side. In the example above, the target being tracked has an Azimuth of 173° 44’ 03”, so just short of the Meridian, and as displayed it will reach the Meridian in 16mins 51secs. The HA limit has been set to 0.1 hours which is 6mins. Therefore, the MF will occur in 16mins 51 secs + 6mins = 22mins and 51secs. This is displayed as a counter in the status in the red box and will count down to zero.
When the counter reaches zero, EKOS will start the MF process.
Setting the HA at which EKOS will start the MF requires knowledge of the following:
- How the Mount performs a MF. For example, the Mount may perform a MF if the HA is greater than or equal to zero, or there may be a configurable range of HA that can be set that allow a MF. NOTE: EKOS prevents a negative HA being set for the MF, so it is not possible to start a MF before the Meridian.
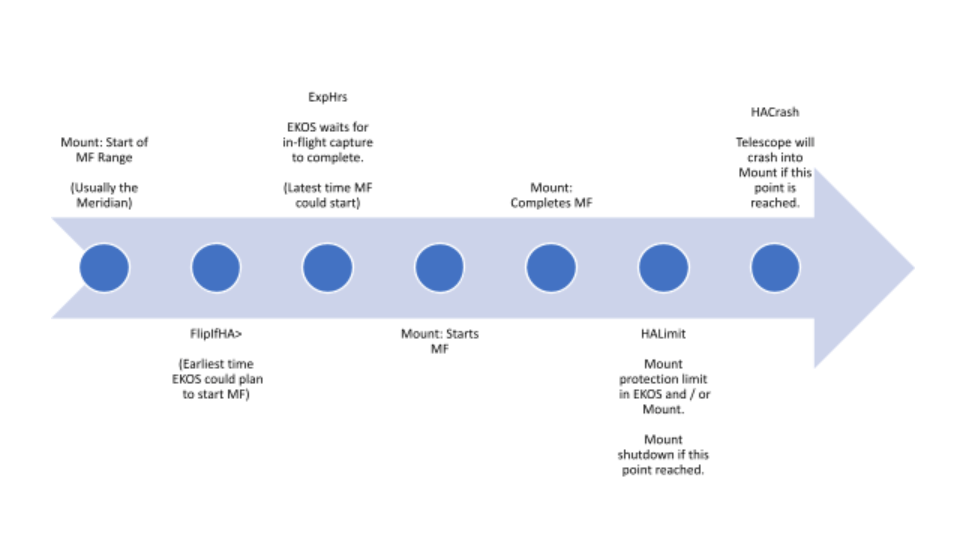
- The HA limit of the equipment before the telescope collides with the Mount. Lets call this HACrash.
- Any HA limits that have been set in EKOS, or in the Mount itself. Lets call this HALimit.
- The Flip if HA > setup in the EKOS Mount Tab. Lets call this FlipIfHA>.
- Exposure length of subframes being captured, including time for dithering (if applied) and settling time (if applied). Let call this ExpHrs.
In the following graphic, time is increasing from left to right as the mount tracks past the Meridian. It lays out the order of events:
How EKOS organises the MF
Firstly, EKOS sets a status to inform the Capture Module that a MF is pending and to pause when it reaches the next convenient point. Capture will finish off the current exposure that is running and complete any associated processing such as dithering and settling, but will not start the next sub-exposure in the sequence.
Note, this actually means that the MF will happen sometime during the range of time from when the MF is scheduled until the sub-exposure capture time after this (plus dither + settle time). So when planning the setup of the MF make sure that this is taken into account. For example, for 30min exposures ensure that the possible extra 30+mins will not take the Mount out of the range from where a MF can be supported.
Once the in-progress exposure has been completed, the Capture Module pauses Capture. EKOS prepares the MF by:
- Suspending Guiding
- Suspending Tracking
- Issuing a slew command to the Mount for the current target location.
The Mount Performs the MF
The Mount receives the slew command and works out how to action it. One of 2 things will happen:
- Perform the MF. In this case, although the current and new positions are the same the Mount is aware that it has crossed the Meridian and it is in a “telescope low, counterweights high” position. So the Mount performs the MF to return itself to a “telescope high, counterweights low” position, again pointing at the target.
- Nothing. If the Mount does not think it has crossed the Meridian yet then it will calculate that the current and new positions are identical and that it has nothing to do. This could occur if, for example, the Mount’s has not been synchronised with EKOS.
EKOS Monitors the MF
The MF will take the mount some time to complete and will be monitored by EKOS. When the mount completes the slew, it will report side of pier to EKOS. EKOS will use this to determine the success, or otherwise, of the MF.
If the side of pier before the MF is different from the side of pier after the MF then the MF succeeded. If it is the same, then the MF failed. EKOS will wait (for 4mins) and retry. This is done to get around small timing differences between EKOS and the Mount when EKOS starts the MF just past the Meridian, but the Mount does not believe it has crossed the Meridian yet.
When the MF is deemed to have been successful, the post MF actions are performed.
EKOS’ Actions After the MF
After a successful MF, EKOS performs the following:
- The target is aligned, if Alignment was originally performed on the target. Control is passed to the Alignment Module to perform the alignment.
- Restart tracking. EKOS asks the Mount to restart tracking.
- Restart guiding, if Guiding was in progress prior to the MF. Control is passed to the Guiding Module to restart guiding.
- Refocus. If the Scheduler is being used and the Focus option has been checked then EKOS will refocus by passing control to the Focus Module.
- Restart capture. The Capture Sequence that was suspended at the start of the MF, is now restarted from the point at which it was suspended.
- Reset the parameters and timer for the next MF (in just under 12 hours).
The telescope and imaging train have been flipped through 180 degrees so frames taken after the MF will be “upside down” from those taken before. It is easy enough to compare a before frame with an after frame in Fitsviewer by rotating one of them through 180 degrees.
Testing in Daylight
A good way to get the hang of a MF if you are unsure is to practice in daylight. Whilst all simulators could be used it is also possible to connect up your actual Mount with some other simulators such as the Camera Simulator.
Pick a target near the Meridian, goto it and setup a MF. Watch the target track across the Meridian until the HA limit you have set is reached and then EKOS will perform the MF. This is a good way to check your setup physically for things like snagging cables as well as checking out various configuration options.
Click here for a video explaining how to do a MF.
This is also a good way to workout the physical limits of your setup, i.e. how far your setup can go past the Meridian before the imaging train crashes into the mount. Remember that the impact point may differ for a southern MF than for a northern one. It will also differ as you change your optical train either by adding equipment or changing its physical configuration, e.g. rotating the camera may result in the filter wheel now becoming an earlier point of impact.
Setting HA Mount Limits
Protecting your equipment from crashing into your Mount is very important. A key step is configuring a MF, however, if you forgot to check the MF checkbox on the Mount tab, or if there was a problem somewhere there is still a risk of a crash. So here are some other things to do to add protection:
- HA Limits can be configured in EKOS’ Mount Tab as shown below. If would make sense to set a limit near, but before, the point at which the telescope would crash into the Mount. So, for example, if a crash would occur at 2hrs 15mins, then setting limits at 2hrs would be sensible.

- If your Mount is capable of supporting HA limits itself then, providing these can be configured without affecting EKOS’ control of the Mount, then it would make sense to configure them. This would provide an extra level of protection in case EKOS has a problem.
- Use Watchdog. EKOS provides a utility called Watchdog, which is documented here. Watchdog can be configured to regularly check for a heartbeat from EKOS, such that if EKOS fails, Watchdog can takeover a perform a graceful shutdown. A simple action would be to park the mount which would, itself, move the Mount to a safe position and stop it tracking, thereby avoiding a telescope / Mount crash.
EKOS Configuration Parameters
There are several parameters that can be set to affect the detail of how EKOS performs a MF. These are detailed here:
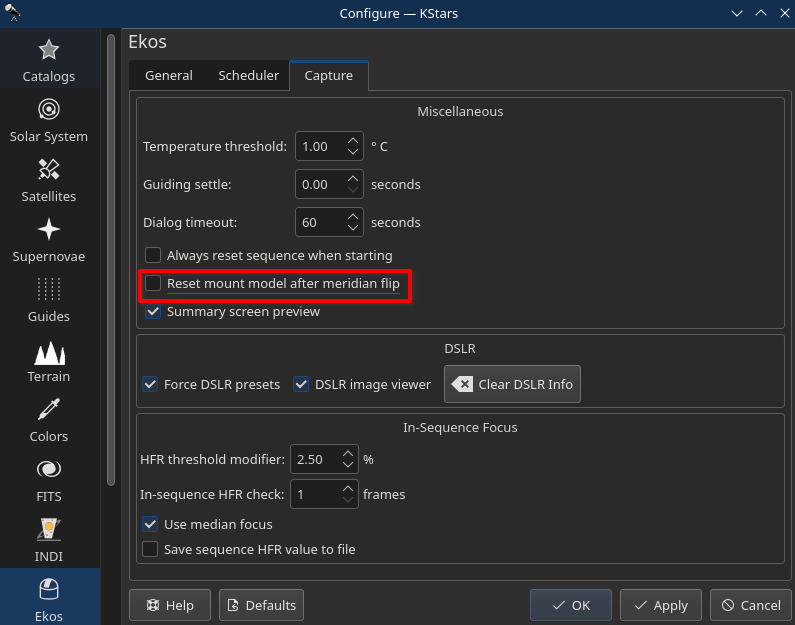
Reset mount model after meridian flip. Located in the Capture Tab of the Ekos configuration parameters, checking this parameter will clear the alignment model after a MF. If you have problem with the Mount model after a MF it would be worth setting this option.
Resetting or Reusing Guide Calibrations. This is a decision you have to make for Guiding in general as to whether you get better results by re-using your guide calibration or by recalibrating after each slew. This is relevant for a MF as, at the Mount level, the MF is treated as a slew.
The thing to bear in mind with calibrations is that they will vary in accuracy at different parts of the sky. The usual recommendation is to try and calibrate somewhere near the intersection of the Meridian and the celestial equator as this will tend to produce the most accurate result assuming your equipment performs equally wherever in the sky it is pointing. Alternatively, for your equipment the theoretical improvement in accuracy obtained from calibrating at a sweet-spot may be outweighed by a calibration specific to where the telescope has just slewed. You will just have to try this out for your equipment and select the best approach, then set the check boxes appropriately:
- Reset Guide Calibration After Each Mount Slew
- Store and reuse guide calibration when possible.
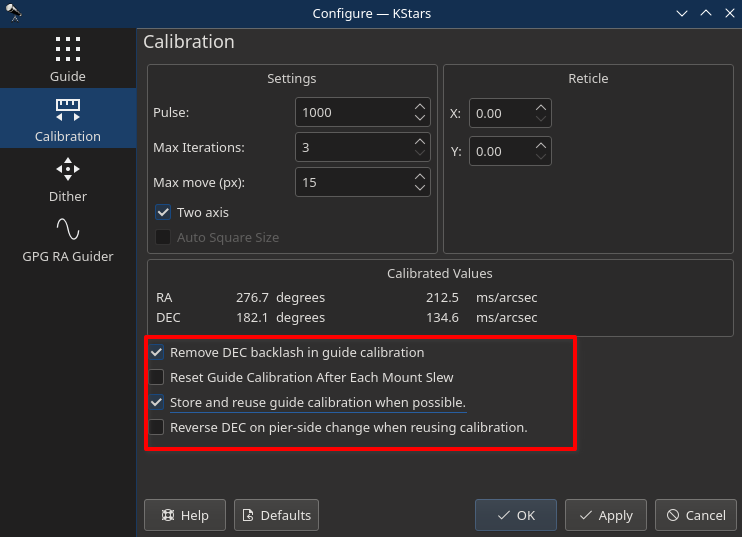
Reverse DEC on pier-side change when reusing calibration. When a MF happens and the pier-side changes, DEC is reversed and the target now appears “upside down”. This does not really matter from a guiding perspective as the Guider will instruct a guide pulse in a certain direction, but the Mount may or may not require the guide pulse in DEC to be inverted. If you can find out the information for your Mount then that helps. Otherwise, leave the option unchecked, but if guiding drives the guide star away in DEC after a MF, rather than centring it, you could try checking this option.
There is an equivalent option in PHD2 and those folks did some work to recommend settings for various mounts, so worth checking here.