


DSLR Cameras

INDI can control most cameras supported by GPhoto library using the INDI gphoto driver. This includes most DSLRs cameras. Make sure the OS does not mount the camera as a disk-drive as this would prevent the driver from communicating with the camera.
INDI should be able to support any camera supported by libgphoto2, including Canon, Nikon, Pentax, Sony, & Fuji DSLRs. Once you connect, you will be provided with a standard set of controls supported by INDI, as well as full exposure to all parameters supported by libgphoto. You must set your camera to Manual/Bulb mode in order to get full control via INDI. This can be done by turing the rotatory controls until they point at BULB or MANUAL mode.
There are two types of drivers available:
- GPhoto Driver: This is the generic driver that works with all camera. The driver name is always "GPhoto CCD" and it can connect only to a single camera at a time. The executable is indi_gphoto_ccd.
- DSLR-specific drivers. These drivers can connect to multiple cameras of the same type (i.e. two Canon cameras) and driver name would reflect the detected camera name.
- Canon: indi_canon_ccd
- Nikon: indi_nikon_ccd
- Pentax: indi_pentax_ccd
- Sony: indi_sony_ccd
- Fuji: indi_fuji_ccd
Besides the differences outlined above, the drivers are idential in every other way.
On the first time you use the driver, you must set the required CCD Information specific to your DSLR model. Your client should provide you with a list of drivers you can connect with.
Under Ubuntu, you can install the driver via:
sudo add-apt-repository ppa:mutlaqja/ppa
sudo apt-get update
sudo apt-get install indi-gphoto
Features
Compression
The gphoto driver provides you with an option to compress incoming streams and images. The compression option enables you to balance between network load vs. CPU load.
If compression is enabled, network load is reduced (If your camera is not remote, network load is negligible), but CPU load is increased. If compression is disabled, network load is increased, but CPU load is decreased. The compression is disabled by default. The compress only applies to images captured in FITS format and it would produce a .fits.fz compressed file which can save up to 70% of the image size.
External Shutter Release
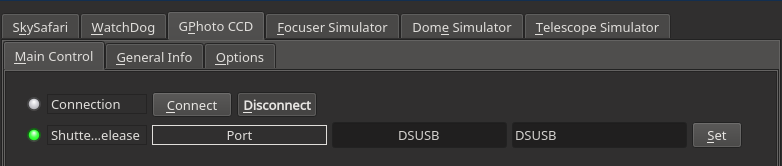
If your camera uses an external shutter release cable, make sure to indicate the port of the shutter release USB cable (usually /dev/ttyUSB0) in the Main Control tab of the GPhoto driver before connecting to the camera.
When using external shutter release cable, you must use the GPhoto generic driver and not a camera-specific driver (e.g. Nikon) as only the GPhoto generic driver would work with external shutter release cables.
Additionaly, users may employ DSUSB/DSUSB2 from Shoestring Astronomy in order to control the shutter. Before you connect, the port field must be set to DSUSB.
Auto Noise Reduction in some camera models (e.g. Canon 350D) can make exposure times take twice their expected duration. Turn off auto noise reduction in camera settings (Custom Functions #3).
Image Format
By default, the transfer format is set to FITS. Images from the camera can be transferred in native (e.g. CR2, NEF..etc) without converting to FITS first. This can reduce latency and CPU usage on the server. Furthermore, FITS images can be larger in size compared to native formats such as RAW/JPEG. The FITS images are transferred as Bayered frames and it is the clients responsiblity to debayer the image upon reception.
Raw images from the camera will be in whatever mode your camera is set to (normally either RAW or JPEG). When using RAW images, it is the client software's responsibility to convert these to a usable format via libraw or equivalent. You cannot use RAW+JPG mode it is not supported by the driver, you must pick a single format.
To retain Image Format settings between sessions, set the desired Image Format then save the driver configuration under the Options tab
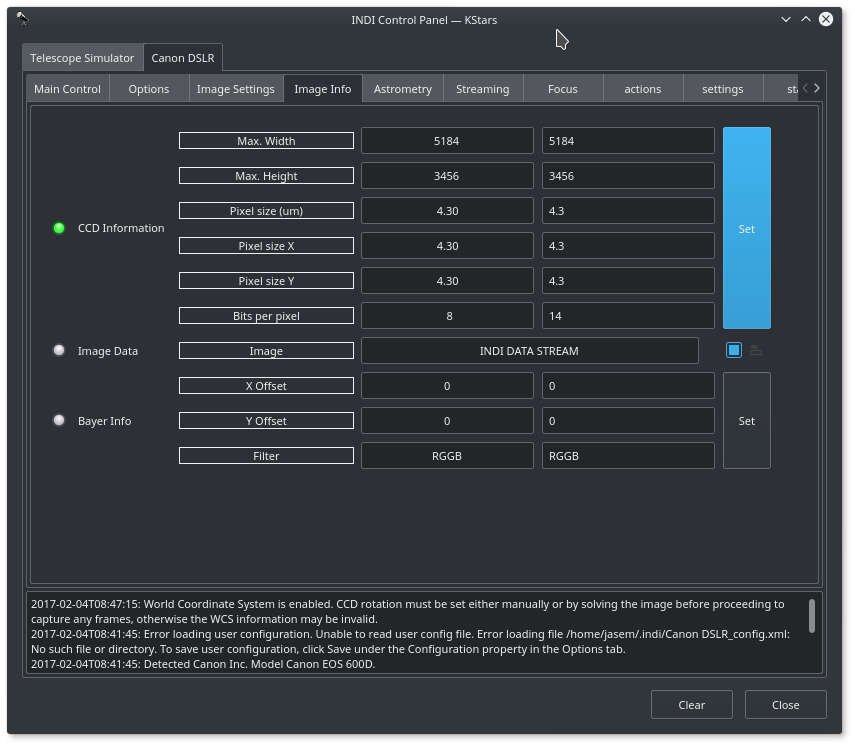
Image Info
The image info tab contains information on the resolution of the CCD (Maximum Width & Height) in addition to the pixel size in microns. Make sure that the information in this tab is correct and update it accordingly. By default, all values are set to zero, please update it to fit your CCD chip specification. The resolution value will change automatically after each exposure in case the image resolution is changed due to selecting a differently sized image from the drop down list.
Some clients like KStars will ask you to specify the maximum resolution of your camera and would limit the camera's image to this specific size.
Since GPhoto tends to produce different image sizes for CR2 vs. FITS image. it is critical to use only one method when imaging. You cannot take CR2 flats and mix them with FITS Lights. All images in a session must be all CR2 or all FITS.
Mirror Lock
GPhoto driver supports mirror lock in order to reduce mechanical vibrations. It's currently implemented only for Canon DSLR. You must Enable Mirror Lock feature in your camera before you can use this feature in the driver.
To enable it in your camera (usually in the last tab, Custom Functions, called Mirror Lockup). Then set the serial port for shooter, and open the gphoto camera as usual. When a serial port is set, now a new setting appears on connection: "Mirror lock", with a default value of 0.
Set it to a reasonable value (2 seconds will do). Now when shooting, you'll hear two "clicks" from your camera instead of the usual one: the first pulls up the mirror, the second (after the number of seconds you specified) opens the shutter and starts the exposure.
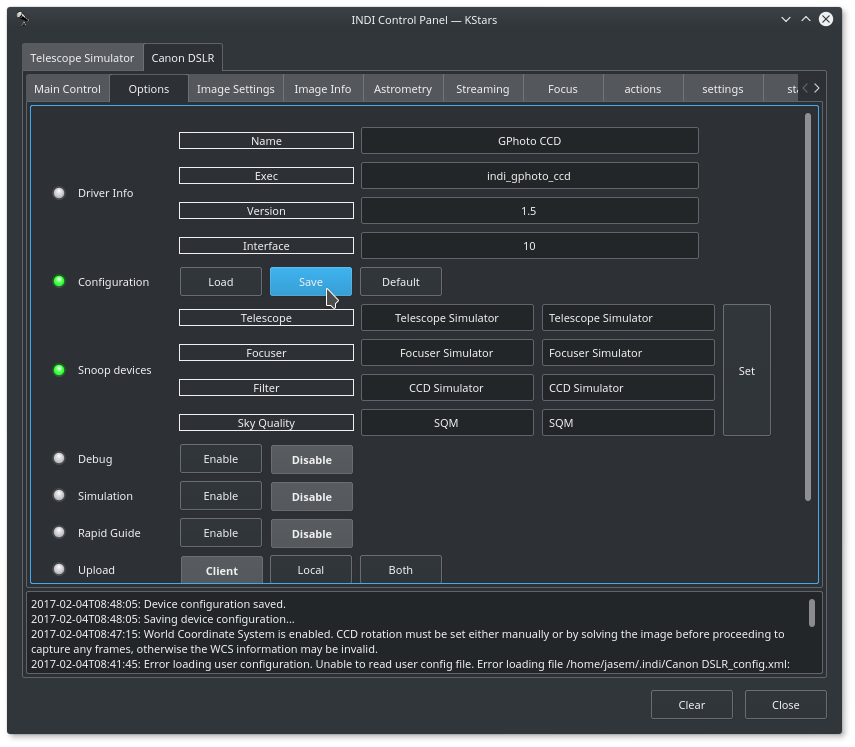
Saving locally
You can opt to save all captured images to the local storage. This is the local storage of the device running the INDI GPhoto driver and not the SD Card. Settings for saving to SD card is also available. Under Options tab you can select the Upload mode:
- Client: Upload image to client.
- Locally: Store image on the machine where the driver is running. Do not update to client.
- Both: Store image on local storage and upload to client
Live Preview
GPhoto driver support live video preview mode if supported by your camera. KStars is the only client currently that supports live preview mode. To Enable, click on the Enable Preview in the driver's main control tab.
The Live View supports zoom levels of 5x and 10x respectively.
Focusing
If supported by your camera, you can control Focus In and Focus Out with speed settings under the Focus tab of the GPhoto driver. You can autofocus with any client that supports INDI auto-focusing.
Operation
Once you're connected, you can capture images as FITS or RAW from the camera. When using Ekos, you can configure what DSLR format is set to in capture module. Ekos automatically switches format to FITS when using Focus, Guide, and Align modules.
When using the driver for the first time, you must set the CCD Information specific to your DSLR model. Initially, all parameters are set to zero as shown below.
![]()
Fill and set the required parameters. For example, for Canon 600d. The following values were used. Please note that Bits Per Pixel is always set to multiples of 8 regardless of the DSLR's bit depth. This is because FITS format are transferred in multiples of 8.
After setting the parameters, you should save the parameters to the DSLR's configuration file so that they are loaded in future sessions.
INDI will detect any extra options that your device may support and if found, INDI shall construct dynamic controls (knobs & switches) to control these features.
Nikon
Nikon is officially supported under GPhoto but the level of features supported is less than that of Canon cameras. Noise Reduction must be turned off. For bulb exposures to work, you must set Capture Target to SD Card. By default it is set to Internal RAM which is problematic in Nikon cameras. Please save configuration after setting capture target to SD Card. If all fails, resetting the camera to Factory Defaults might help some users.
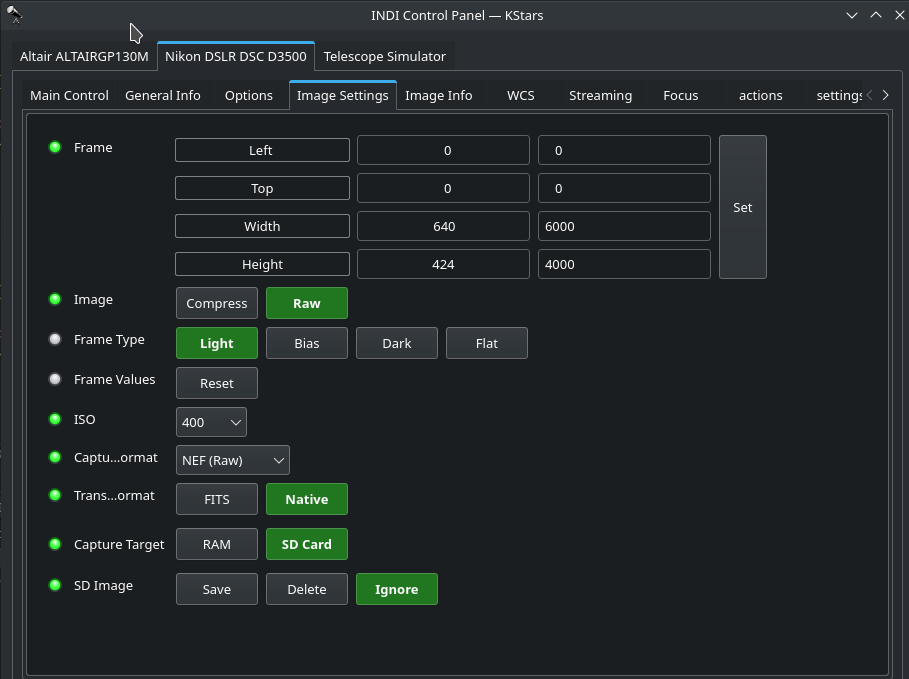
There are three settings for the SD card image handling:
- Save: The image is downloaded to INDI and also saved to the DSLR camera internal storage.
- Delete: The image is downloaded to INDI and deleted from the DSLR camera internal storage.
- Ignore: The image is saved to the DSLR camera internal storage and never downloaded at all. So no images are sent back to the client or saved on the machine local storage, it is only saved in the camera. This option might be useful to expedite the capture process.
Canon 10D, 20D, 350D
 Some of the older Canon Cameras can only be operated in NORMAL mode. Adjust the camera communication settings menu and set it to Normal mode. When the camera is connected, it should appear like Canon EOS 20D (Normal Mode). If the camera shows in PTP mode then it cannot be used in the driver.
Canon 1DX
The following settings would make capture possible with Canon 1DX camera according to this INDI Forum Thread:
Main Control:
Mirror Lockup = 0 (It I set the mirror lockup on it would fail, and I would need to reboot the system and restart KStars on the Mac)
Options:
Force Bulb = OFF (Camera was set to Bulb mode, if I used Force Bulb it would fail)
Image Settings:
Capture Format = RAW
Transfer Format - Native
Capture Target = SD Card (I think this one was the key in the Image Settings tab)
SD Image = Delete
Canon EOS Ra, R5, R6
Camera produces CR3 formatted RAW images which are currently only supported on StellarMate. In case you run into capture issues, make sure to enable "Release shutter w/o lens" in C.Fn5
Fuji X-T3
Fuji cameras are supported with some limitations. Checkout the detailed HOWTO for operating Fuji X-T3 and X-T4 cameras.
Fuji X-T1
When using X-T1 with Remote Serial Shutter, please checkout this detailed HOWTO for operating the camera in BULB mode.
Sony A7III
The INDI Sony driver is reported to work well with the Sony A7III camera.
- Set the camera format to RAW.
- Set the camera capture mode to BULB.
- In the INDI driver options, Force BULB must be enabled at all times even when taking short exposures.
- If the ISO setting is set to AUTO then the camera will capture images at ISO 80, so it's recommended to specify exactly the desired ISO setting explicitly.
Here are some in-camera settings that might be helpful:
Camera --> Controls --> M modus --> AF set to AEF
Camera --> Settings --> Camera Tab > 4 > ISO set to 100
Camera --> Settings --> Camera Tab > 4 > DRO/Auto HDR set to "Off"
Camera --> Settings --> Camera Tab > 5 > Long Exposure Noise Reduction (NR) set to "Off"
Check the there are no features in the camera that prevents the camera from going to Bulb mode (e.g. Silent Shutter).
Olympus OM-D E-M1
Even if you set the mode to BULB, the camera automatically switches to M mode and the exposure is set to 1-second automatically after the first capture. To resolve this, set the mode back to BULB after the first capture and subsequent captures should be fine.
Pentax
There are two INDI drivers for Pentax cameras, both with limitations. The GPhoto-based driver is called Pentax Legacy, while the native driver is called Pentax Native. The native drivers offers more functionality over the generic GPhoto-based counterpart.
For some cameras, setting to BULB mode does not work and you must switch it to MANUAL.
Exposure Modes
The driver offers two destinct methods of taking an exposure. Bulb (B) and Manual (M) modes
The first one utilizes the camera's internal list of predefined exposure times (exposure widget: shutterspeed). In this mode, when an exposure is triggered, INDI compares the desired exposure time to the shutter speeds offered by the camera. If it finds an exact match, it fires the shot. If it does not find an exact match, it selects the closest one (if considered close enough, otherwise INDI will fall back to B mode which does not work with these cameras) and fires the shot. For example, a Canon 5D Mk2 does not offer 1/100s. When a 0.01s exposure is requested, INDI triggers a 1/90s exposure. The fits header will show EXPTIME 0.0111111s in this case.
The second method utilizes the camera's bulb mode (bulb widget: eosremoterelease). In this mode INDI opens the shutter, starts a countdown, and as soon as zero has been reached, it closes the shutter.
The FORCE BULB (under Options tab) setting tells INDI whether to look for camera internal shutter speeds first, or use bulb mode right away.
Generally, bulb mode works well for all exposure times except short ones and manual mode works perfectly for all shutter speeds that are predefined in the camera. Since very short exposures can't be produced precise enough in B-mode, it is a good idea to use bulb mode for exposures of 1s or more, and manual mode for exposures of less than 1s.
Unfortunately, cameras like the Canon 5D and 6D have a separate B-mode (selectable via main dial) whereas for most other Canon cameras "B" is just one of many shutter speeds within "M" mode. What it means is INDI cannot toggle between Manual and Bulb with cameras like the 5D and 6D. What's more, INDI reads the list of available shutter speeds from the camera at startup, when the initial connection is made. If the 5D/6D's main dial is set to "B" at that time though, the list contains "bulb" only. In order for INDI to obtain the full list of available shutter speeds, the camera must be set to "M" when the connection is made.
Therefore, as a general rule of thumb:
- Set Force Bulb ON while in B-mode for exposures of 1s or more.
- Set Force Bulb OFF while in M-mode for exposures <1s
When other combinations are attempted, it results in undefined behavior. The results depend upon two things:
- The exposure time set in INDI.
- The shutter speed that is set in the camera's sub-dial.
For example, if:
- The Camera is set to M-mode but
- Force Bulb is ON,
- The exposure time selected in INDI is 1s and
- The shutter speed in the camera's sub-dial is set to 1/10s
This wold lead to 3 exposures of 1/10s each (the camera keeps firing 1/10s shots for as long as INDI runs its count down), the first two triggering error messages and the last one resulting in a downloaed image.
For users with dual M/B rotary settings, make sure the camera's main dial is set to "M" when INDI is started. Secondly, for exposures of 1s or more, use the "Force Bulb = ON" / "B"-mode combination and for exposures of less than 1s use "Force Bulb = OFF" / "M"-mode.
Flat Frames
Taking flats requires particular attention. Users can set an ADU level and some clients (e.g. Ekos) will try to get there by taking test shots and adjusting exposure times until the desired ADU level is reached within a certain tolerance that can be set by the user, too. Some flat boxes feature a (too) bright light source which in turn requires rather short exposure times in order to achieve a suited ADU level. So the "B"-mode camera user might want to set the main dial to "M" and switch "Force Bulb" OFF. Let's assume the target ADU level is set to 30.000, tolerance is set to 1000. INDI takes a 1/10s shot which delivers 2400 ADUs. The next shot is taken at 1s which delivers 24000 ADUs. Now, in order to get to 30.000, the exposure time would have to be increased by 25% (to 1.25s). However, the camera does not offer a shutter speed of 1.25s. The two neighbouring shutter speeds (1s and 1.5s) cannot deliver the targeted ADU level within the given tolerance. This attempt to take flats will fail. With other cameras, INDI would automatically switch over to B mode, start a 1.25s countdown and succeed. B-mode cameras require the user to manually intervene. Two possibilities:
- Increase tolerance, in this case to 7000, for instance. The 1s shot will be good enough, 1s be used for all flat frames.
- Set camera to B, set Force Bulb to ON, set exposure to 1.25 and start again.
Troubleshooting
In case the camera fails to connect or capture, please make sure of the following:
- Make sure the battery in the camera is full. If using a dummy battery, ensure that the power supply is sufficient in terms of voltage and current capacitiy. Otherwise, the camera may behave erratically.
- Make sure the SD card in the camera has enough space.
- Make sure camera is set to Bulb/Manual mode. You might need to rotate the dial to Bulb or Manual and then adjust camera settings to enable BULB mode.
- Turn off any power-saving feature of the camera that might cause it to hibernate or sleep. Some cameras support adjustable inactivity timers before automatically turning off. Set such timers to 15 minutes or more.
- Try a different USB cable.
- Try a different USB port.
- Turn off Noise Reduction settings in the camera.
- Turn off mirror lock in the camera settings.
Driver Name
GPhoto CCD
Driver Executable
indi_gphoto_ccd
Family
CCD
Manufacturer
Various
Platforms
Linux, BSD, OSX
Author
Jasem Mutlaq, Geoffrey Hausheer
Version
2.6